Thursday, September 4, 2014

Project: Reclaimed Barnwood Desk - Prologue

I've been really enjoying woodworking more and more lately, and in an effort to learn more skills, and practice things I already knew - I am tackling a desktop project.

A friend of mine donated a lot of old barnwood to me, and I wanted to make something with it.  A lot of the boards had twists or were cupped, so I selected the straightest pieces I could find.

But for the base of the desk (sometimes referred to as a carcass), I used a 20" x 48" x 1/2" laminated pine project board from Home Depot. They're cheap, flat, straight, and square. Also they're fairly rough, so gluing to this 'base' will be easy.


After selecting a few of the straighter boards, I laid them out on top of the carcass, to get a feel of how it would look. Also, it gave me a good idea of how much wood would be required for the project.


You can see quite a difference from the really old boards versus the new pine board. Close to the same thickness, bringing the overall thickness to a bit under 1.5", give or take.


After laying out the boards on the carcass, I realized I didn't like them as wide as they were. Or is it depth? Depends, I suppose. Regardless, the boards were around 5" wide, and because some were mildly cupped, ripping them to 2.5" wide boards would lessen the cup, and also provide more boards to vary a pattern with.

I had picked up a "Footprint Tools Clamp and Cutting Guide" from Lowes a while back, and this would be the best opportunity to use it. I would have used a table saw, but it was broken, and well, it would have been tough to move anyway.


Now, this clamping and cutting setup is not ideal, at all. Possibly unsafe as well. But if you are cautious about where the blade is in relation to your body parts - at all times - you'll come out of it un-injured. But really, I would have killed for a table saw, 40 minutes of a portable circular saw would have been 5 minutes or less on a table saw.


Once all the boards were cut, I clamped them together, and took a belt sander to one side, to try and create a flat, even surface, and to bring the width of the boards down to 'near the same'.  A scrub plane and a rough smoothing plane would have been a better choice, but I wasn't confident enough with planes yet to try.


Now, that big pile of wood, although it looked good, wasn't entirely usable. Some of the boards had knots that were too large, splits, cracks, and surfaces that would not yield a nice desktop. So I had to take them to the miter saw, and hack off the bits that I couldn't use.

(Above: Not much left after a trip to the miter saw to remove the bad wood & knots) 

Layout of the re-sized planks, trying to come up with a 'random' pattern that also looks good and fits well. Had to use my Japanese pull saw and miter box to trim up a few planks to fill the leftover spaces.


And with that, I'll leave it for now. Next steps will be securing the boards to the carcass, smoothing the boards, fixing holes, putting on edging... okay a lot of work left to go.

Stay tuned!

-Nelson
Monday, September 1, 2014

Project: Quickie Clamp Rack

Over time anyone who is somewhat into woodworking will collect clamps. Usually the clamps are of different lengths, shapes, manufacturers, and so on. This can make things a bit difficult, mostly because you'll likely have them all over your shop, or one rack won't work for all your clamps.

I'm sort of in that boat for my clamp collection. But I wanted to at least get my clamps into the same wallspace, and somewhat organized, so I didn't have a few clamps here and there.

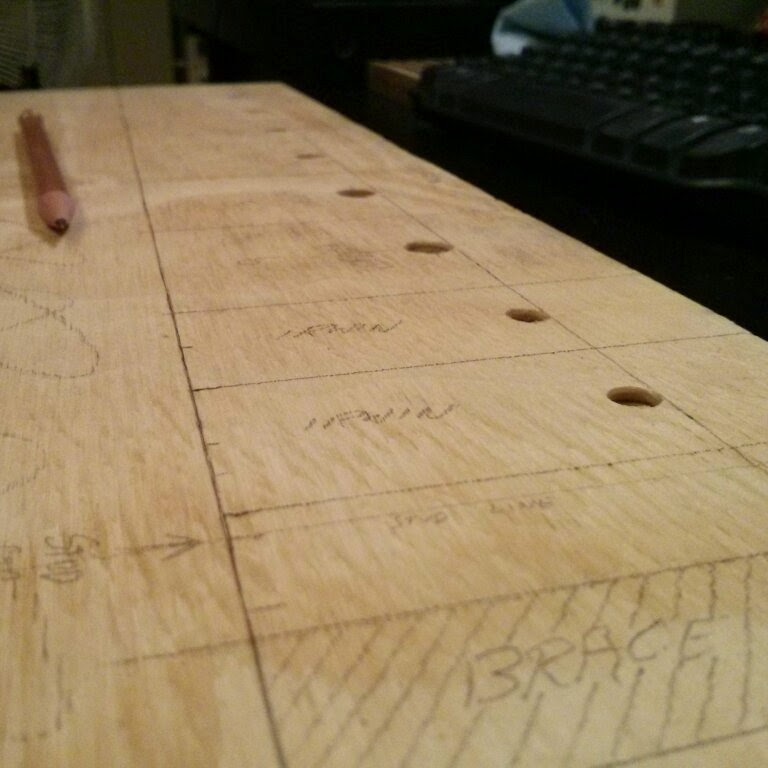
First I start with the prep work/design. I measured out the thickness of the bars of my clamps, worked out the spacing front to back, and side to side. Then it came down to marking out where the brace pieces would be, where the studs were, and put that all together into a design.

(Above: Having a good game plan will help you in the long run)


After working out the rough design, it was time to break out the forstner bits and make some holes. Once those were drilled, I took my board (which was scrap/leftover plywood) and took it outside to make more cuts. It was too wide and too deep, so a visit with mister circular saw and captain jigsaw, it was brought down to its final size.


Once I had it cut down to a more manageable size, I pulled out my Japanese pull-saw, and got to work cutting the grooves for the clamps. Now, I could have used my jigsaw, but I wanted practice with the hand saw, and I could be a lot more cautious with my cuts. And accurate too, I suppose.


Many minutes of cutting later, and I had the clamp grooves all finished.


Then I moved on to cutting the back piece, and the support braces. I opted for 4 instead of the original 2 that I had planned, and then pre-drilled all the holes I needed to get everything mounted. After that came sanding everything smooth, first with 80 grit, then with 150. I'm not going to make it any smoother, since it's just cheap plywood, and I'm not bothering with a finish.

(Above: My inner OCD kicked in a bit.)

Pre-drilling was a good idea, as it made the glue-up a lot easier. I just had to glue the seams, put the part in place, and screw it tight. No bother with clamps. Nice and simple. 


Once the glue dried, I was basically done. I had to drill 4 more holes (16" center to center...) for the screw holes for where I planned to place the stud-lines. Easy enough. But I was pretty happy with how it looked up to this point!


And finally, after clearing some space and reorganizing the planned area for the rack... I mounted it up with some long 'washer-screws' and hung my clamps. For a relatively quick project, I am very happy with the result. AND I left room for 2 more Bessey clamps. ;)


Thanks for reading, I hope you enjoyed this project, and feel free to comment if you have any questions!

-Nelson

Friday, August 22, 2014

Project: Custom Built Shelf - Better Than IKEA

Everyone buys something at Ikea at one point or another. Their stuff is cheap, looks good, 'relatively' durable, and can be hacked for the most part.

The "Ekby Valter" bracket is one of those Ikea items that gets hacked a lot. Usually into the form of a mount for pendant lighting, or variations on shelving.

Here's how it looks normally:


For the most part, that shelf is totally fine. Except, the boards they sell you don't span over more than 3 stud widths. Their longest board is just a bit shy of 4 feet. Irritating to say the least, since most studs are 16" center-to-center - and there's no way I'd use these brackets in just plain drywall.

So in order to get these to span a wider distance (roundabout 8 feet or so) and to make them more secure by mounting the bracket into studs... and lastly to make the shelf strong and secure (the boards Ikea sell are pretty thin, and I plan to put a decent amount of weight on my shelves)

I started out by locating the studs, and mounting the brackets. I mounted them 20" down from the ceiling, which is a decent height for the shelves, and keep things 'up and away' for the most part.


Once I had the brackets mounted, I placed the rough cut 2x12 on top (it was a bit over 8 feet in width - 98" overall or so), and I scribed where the bracket faces meet the shelf board on the bottom.


Next I set up a 'poor mans dado' jig, which is a circular saw and two boards/guides clamped on to the correct dado width. Passing the circular saw over in small bits to remove as much wood as possible, and then cleaning up the dado by hand later.


After some rough chiseling and filing, the dados were looking pretty fair. They don't need to be perfect looking, they just need to be flat.


Once the dados were cut, it was time for a test fit, and hope that everything still lined up correctly...

(Above: Nice! All of the dados align correctly!)

The next step was to flatten the roundovers, since I used cheap framing lumber, they always come with the corners rounded, and I frankly don't like the look. Also by planing them off, it reduced the depth of the board to the same depth as the shelf bracket arms. (Close to 11" deep)

(Above: Luckily I had access to a handheld power planer, making quick work)

Another task that is hard to see in this photo below, was notching out 3/8" out of the back of the dados, to get the shelf to fit around the brackets against the wall.

At the back where the shelf almost meets the wall, is a slight gap, to allow extension cables to run behind it. Without the notch, the gap would have been close to 3/4", which was too much for my taste.


And here's the finished result! The shelves hold a number of storage boxes (I could stack them 3 high, but that's a bit too tall) - the shelves can support a good amount of weight, and because I used 2x12 lumber, are plenty thick and shouldn't bow with the weight.

(Above: Click the photo to enlarge it for a better view)

I'm very happy with the way they turned out. I'm leaving them unfinished as I like the color of the raw wood, and they don't get much abuse so durability isn't an issue. AND they cost me less than the Ikea shelf boards would have cost to buy to cover the same span!

Tuesday, August 5, 2014

Project: Corner Shelf - Second Version

In a previous post, I had built a corner shelf for my bathroom - because counter space is kind of limited. Turns out, my mother liked the way it looked and asked if I could build one for her. Since I had material left over from building the first shelf, I got to constructing another one - with some improvements.

First I had to cut some 1" wide strips, for the shelf to attach to. I then cut the shelf with a jigsaw to try to match the angle of the wall. The bathroom wall is not square. In fact, the wall is roughly at a 92 degree angle. I wish I took pictures on how I managed to trace out that angle - because it was kind of creative problem-solving.

I tuned an old hand-plane and took off some excess material from the board, it needed some tweaking, and I didn't feel like bringing out the belt sander, especially since I could get a good finish with the plane.

(Above: An old Stanley plane is sometimes a better option than sanding)

Assembly is relatively easy. I put down the 1" strips of wood, and placed the corner shelf on top to check if it was level. 


It was 'close enough' - so I marked the bits that stuck out with a pencil, and marked underneath with a pencil where the strips should attach to the shelf. 

(Above: Fit looks ok, mark off the excess with a pencil to trim later)

Now for the fun part - the power tools. 

I pre-drilled some pilot holes, mostly because I'm certain the wood would split if I just tried to sink screws in without them. My Ryobi countersink bit does okay, I lost the allen key to adjust the depth however. 


(Above: Pilot holes and counter-sinks are your friend)


I used drywall screws because they were the right length and they were what I had on-hand. Plus, it's not like this shelf will bear a lot of weight, so they'll be more than sufficient. I also didn't glue the braces, because I wasn't in the mood to sand off the paint on the underside of the shelf. 

With the braces secured, I could trim off the excess. I opted to use my Japanese pull-saw, and I cut the braces off on an angle (a bevel?) - just to make it look a bit nicer than the previous shelf that I built. 


(Above: The bevelled cut looks a bit nicer than a square cut) 

(Above: Pull saws are nice, minimal sawdust and clean cuts)

The screws that attach the shelf to the wall needed to be pre-drilled, and then sunk in part-way, to make the installation a little bit easier. Since the screws are underneath the shelf, it's not the most accessible - although an extension bit would take care of that. 


(Above: Having your screws ready to go can make installation much easier)

And voila, she's installed! But... not quite ready yet. The pale wood looks nice, but I know that this shelf will see a bit of unexpected moisture - so I figured some sort of finish would be in order.


I still had some Minwax Wipe-on Poly from a previous project, so I figured that would make a fairly decent finish for the shelf. It didn't take long to apply, and after a few hours of drying, it looked nicer than before, really emphasizing the grain of the wood. It will amber a bit over time, but I'm okay with that. 


And with that, the shelf is finally done! The actual construction time took roughly 25 minutes, mostly because of hand-planing, and a healthy amount of time with the hand-sander, the finishing took a few minutes, and the drying time was about 4 hours. All in all, it was a quick little project, and hopefully I don't have to build another one of these any time soon!


Thanks for reading!

-Nelson

Friday, August 1, 2014

Project: Quick and Simple Foot Stool

I don't know about you, but when I sit at my computer for extended periods of time, I'm always trying to find the most comfortable place for my feet to be.

In the past I've tried a lot of different things, milk crates, stacked books, a plank of wood, garbage can, you name it. None of those things really worked out for resting my feet on. It was about time to build my own foot stool. It's technically a 'foot rest' or 'foot riser' if you want to get real picky about it, but either way - it's a place to put my feet when I'm at my desk.

I started out with a single 24" x 24" x 3/4" piece of plywood from the 'place that sells improvement materials' - did some rudimentary measuring, and got to cutting. I did the cutting with my cordless circular saw, a miter saw, and a jigsaw, which isn't my ideal way to work but I didn't have access to a table saw, and my bandsaw motor is kaput.

(Above: Planing two cut boards to the same width)

Planing plywood is not recommended. Tearout city. I ended up finishing the planing work with a couple files/rasps. And of course, a fair amount of swearing. My workspace was a tiny patio (as you can see in the photo below) which is usually where I do my work, because it's covered from the elements, and I can use the railing as a makeshift clamping surface. 

(Above: Cut to size, and test assembly)

After cutting, measuring, test fitting, I realized I needed to trim a bit more material to clear the baseboards... so a quick visit with "Mr Jigsaw" and that problem was solved. Another thing I learned is that drilling into plywood "end grain" for lack of a better word, is also not ideal. Makes for kind of a poor join, but again, this is just a tiny stool to hold my feet 5" off the ground, so no big deal.

(Above: Test assembly, still have to modify one more thing before glue-up)

For the cross-brace, I decided to do an angle cut into it, to make it look a little nicer, and just in case I needed to clear the base of my office chair. But mostly because it looked nice. And also to correct some poor cuts from earlier. 

After test fitting, adjusting, pre-drilling, and so on, it was time to do the glue-up. This part wasn't totally necessary - but it made the whole project just a little more secure and made it feel a bit sturdier.

(Above: A little dab will do.)

The last part of the whole build (if you can call it that) was to apply a finish to the thing. Cheap plywood is prone to splintering, and generally doesn't feel good. So I spent a fair amount of time sanding the whole project down, made sure it was relatively smooth, and then applied two coats of Minwax Wipe-On Poly. 

Normally you're just supposed to use a rag for wipe-on poly (I think?) but in this case I just used some cheap little brushes which worked out well. In retrospect, I should have poured off some poly into a small cup or container, because pouring it direct out of the rectangular bottle onto the work-piece was really annoying. Lesson learned for next time I suppose.


This is what I consider a 'quickie' project because it was built on a whim, with no real planning or design beforehand, and it was purpose-built to suit a need. It's been under my desk for a few months now, and it's working very well.